The So-Cal dash insert is designed to fit in a variety of early car dashes. The instructions that follow are universal and can be applied to any type of dash.
- STEP 1:
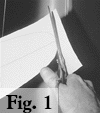
Accurately cut out the paper template and note the location of the centerline marks. See figure 1.
|
 |
- STEP 2:
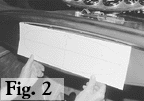
Place the template against your dash to determine the position for your new insert. See figure 2
|
 |
- STEP 3:
Place the paper template against your dash again and position using the layout marks. Tape into position.
Note: Make sure your have the arrow on the template pointing up.
See figure 3
|
 |
- STEP 4:
Take a minute to stand back and visually check to make sure that the panel is leveled and looks correct where it is.
|
- STEP 5:
Carefully scribe or mark with a pencil around the perimeter of the template and remove template from the dash.
|
- STEP 6:
Removal of the material inside the scribe lines can be accompished many ways and the method you choose will depend on the tools you have available. We have listed several ways that we have found to work well and have listed them from best to worst.
Drill a small hole next to and inside the scribe line and cut out the insert using a small, air-powered saw with a fine-tooth blade. Drill a series of 1/4-inch holes around the inside perimeter of the scribe line keeping the holes as close to each other as possible. Use side dikes to snip any remaining metal and remove the waste piece. Use a die grinder to trim out any remaining material. We recommend the use of Black and Decker Bullet drills as we've found them to cut sheetmetal cleanly without grabbing. If your dashborad is removable, you may drill a hole inside the perimeter, weld a bandsaw blade through it and cut the hole out on a bandsaw. The last option is to use a nibbler or jigsaw with a very fine blade. If you use this option be very careful because they may distort your panel or grab unexpectedly.
|
|
- STEP 7:
Whichever option you choose, use extreme care to make the cutout accurate to the template because there is only a small lip around the edge of the dash panel to cover the hole.
|
|
- STEP 8:
Install the dash insert into the dash and place the clamps on the studs on the backside of the panel. The long clamps go on the top of the panel and the short clamps on the bottom. Install the lockwashers and 10-32 nuts and gently tighten being careful not to distort the dash. See figure 4.
|
 |
- STEP 9:
Install your gauges. Your finished installation should be like figure 5
|
 |
- STEP 10:
Don't forget to use SO-CAL's matching dash and shift knobs.
|
|